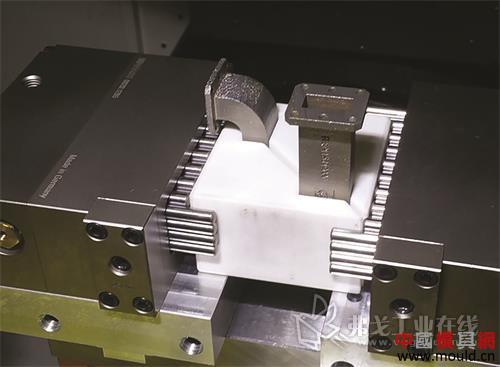
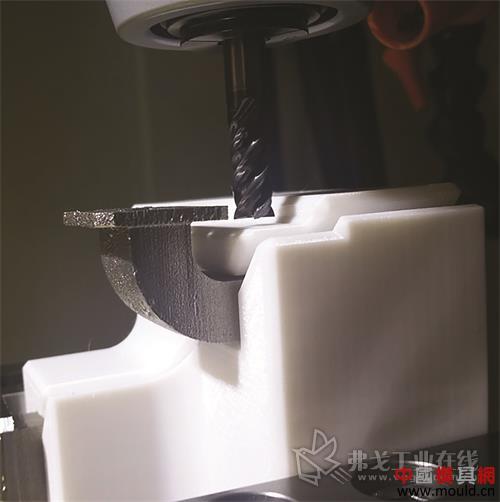
Producing functional parts through additive manufacturing (AM) can help us design and manufacture products that cannot be manufactured using any other methods. With the flexibility of 3D printing, we can make parts with some performance advantages, such as light weight and high thermal efficiency. We can integrate stand-alone parts into a complex overall design, and all this can be done in a single build process. The build process is usually highly automated with high material utilization and production waste. However, additive manufacturing is also flawed. While these advantages exist, additive manufacturing is also facing some vexing problems in post-processing. Finishing of additive-manufactured parts is difficult because of their light weight and complex shapes. Both of these characteristics can create problems with workpiece clamping and vibration, resulting in a process that yields too low. In addition, if the complex parts lack precise post-correction data, the alignment of the parts is also problematic. The problem to be solved in this paper is to make the lightweight parts have sufficient rigidity for effective finishing. We will explore how to make cuttable, non-rigid, additive parts using an effective workholding solution. We will also describe how to use machine tool probes to perform complex additive manufacturing part alignments, help us "find the right parts" within the established shape, and correctly machine critical datum planes. Fig. 1 If the geometry of a 3D printed part is complex, special workpiece clamping devices must be used for machining, perhaps using a 3D printed workpiece clamping device Processing requirements There are a variety of processing requirements, so the additive or 3D printing process cannot process shapes that meet precise tolerances, especially metal materials. Post-processing is usually required to obtain precise round holes and a smooth, flat surface that is connected to other parts. However, too little weight can often reduce the stiffness of additive manufacturing parts, which means that they can't finish the machining process very well. Additive manufacturing parts are complex in shape, and how to achieve stable clamping without causing damage is a problem. Finally, after the additive parts have been formed, they usually need to be processed into a reference pattern. How to install components for finishing is a problem. These problems have many similarities with the challenges faced by manufacturers of composite materials and superplastic forming parts – that is, complex shapes may be deformed and the exact shape must be machined at the location of the deformation. Additive manufacturing users can learn the best way to solve additive manufacturing problems in other industries. Case Study: Microwave Catheter Among the problems of additive manufacturing and processing, the first thing to consider is whether or not the rigidity of the part is sufficient to withstand the loads that must be sustained during processing. This creates many problems. Assuming we now have a part that can provide enough stiffness through design or support, another important issue is how to get the data and calibrate it on our machine. For complex-shaped additive-manufactured parts, there may be some distortion in the construction process, and the lack of accurate data means that we must "find the right parts" within the shape that has been machined. It is critical that our additive manufacturing parts achieve the best five-axis calibration. Figure 2 3D printing clamps for machining part shapes can seal parts in the workpiece clamping device The case study part we are focusing on is a microwave guide designed for telecommunications satellites. The key performance elements of a part include its weight, the efficiency of microwave transmission through it, and its space requirements for satellite payloads. Step 1: Effect of cutting force First, we need to know if the part has enough stiffness to handle the cutting forces we will apply. This can be determined experimentally. The experimental method is to connect the discarded plate with the appropriate material to the dynamometer and estimate the cutting force. After that, the maximum and typical cutting forces determined according to the above method were applied to our parts using finite element analysis (FEA). The effect of cutting force can be observed through a trial cut on a real part. We encountered problems when processing microwave tubes. When the part is being cut, it deviates from the tool and springs back, causing resonance and tool chatter, resulting in a rough surface. The result is that the perimeter of the flange is too small and the surface is less flat. We need to increase the stiffness of the part during the cutting process. There are two methods to choose from: changing the part design or changing the support methods during the process. Step 2: Improve through design? One approach is to consider whether we can make some changes in the design of additive-manufactured parts to increase part stiffness. In the FEA schematic, we have added some supports for connecting the two ends of the part and reduce the deflection we find during the cutting process. The problem with this approach is that we have increased the packaging of the parts, affecting the space occupied by other parts and reducing the overall design efficiency. In addition, our increased stiffness may still not meet the requirements for parts machining using basic workholding methods. Step 3: Reconsidering workpiece clamping If we can't change the part design without losing the advantages provided by additive manufacturing, then we should consider using other methods to fix the parts when performing metal processing. We need to find a way to spread the support of the parts and reduce the deflection and vibration to prevent them from being damaged when the parts are held by hard fixtures. There are many methods, including the use of adhesives for workpiece clamping and the use of a set of moving pins for workpiece clamping in complex shapes. However, we can also consider the method of additive manufacturing, that is, manufacturing some packaged 3D printing clamps. These methods can distribute the clamping force throughout the metal part, reducing the risk of deformation or surface damage. They also ensure that metal parts are closer to the target machining shape, reducing deflection and vibration. Step 4: Prepare for Processing One of the main reasons for the production of machining scrap is the poor geometry of the machine tool, which is reflected in absolute performance and relative drift over time. An error occurs when the linear and rotary motion range of the machine axis exceeds the tolerance required to accurately manufacture the part. Therefore, we must control the geometrical tolerances between the machining datum patterns in different directions, which is the same as machining a microwave tube. We can use the measuring tools on the machine to determine the geometrical accuracy of the part and the contact probe to check the linear and rotational movements. NC-Checker, manufactured by Metrology Software Products, is a software tool for analyzing the results of these inspections. It integrates the detection results into a report and helps us to confirm the actual accuracy of the 5-axis machine tool. Before starting the process, the standard program that comes with our machine tool provides us with a reference point to help us find problems that may affect performance. Over time, this report can also provide machine drift data and issue a warning when the machine reaches a critical point, telling us that the machine may need maintenance. After that, if the machine tool is all right, we can start cutting the workpiece, right? Not necessarily. Additive manufacturing changes the workpiece manufacturing process in many ways. One example is the data generation method. In the traditional machining process, we usually process the reference shapes first, then use these reference shapes to calibrate and position the parts to prepare for the subsequent processing. However, we cannot do this for additive manufacturing because the exact data is added after all other surfaces are generated and the final machining operation is performed. Therefore, the difficulty in setting up additive-manufactured parts is to consider the actual shape that has already been formed, so that we can successfully complete the finishing of the parts. Essentially, what we need to do is understand the shape of the parts we plan to cut in all areas of the exact figure, and consider planned machining allowances and unplanned part deformations. We need to align the parts and leave enough material in all these locations to ensure that the cutting is uniform and effective. This time we also need to use detection devices. You can use NC-PerfectPart to provide a variety of multi-point alignment options that take full account of the material's actual conditions and find the "best match" settings for finishing. For microwave catheters, the initial alignment process is repeated using the material state at all measurement points to determine the amount of multi-axis alignment and positional offset needed to achieve the best uniform cutting conditions. The second stage of the setup process is to probe the six holes in the end flange to find the optimum position offset to ensure the best uniform cutting conditions for hole cutting. Step 5: Processing After completing the perfect fixing and alignment of the parts in the 5-axis machining center, we are ready to start cutting the reference pattern. The critical dimensions of the final part are within tolerances and the surface is flat. Compared to our previous trial machining, the tool chatter and wear were significantly reduced. to sum up Precision machining is usually the "last link" of the additive manufacturing process chain. It is a high-risk link - once we make a mistake, expensive parts may be scrapped. Precision machining is challenging because lightweight, additive-manufactured parts that have been optimized for function cannot be very rigid, and support work clamping is often required for finishing. They are complex in shape and require equally complex fixtures, while 3D printed packaging clamps provide an ideal solution. Machining is carried out with strict tolerances, especially when parts may be deformed and geometrical tolerances must be met. Metrology is critical. Complex alignments can be accomplished with the use of a probe device, "to find the right part profile" inside the material, to ensure that the part can be accommodated for deformation and a more uniform finish machining condition can be used. Steam Autoclave,Aac Autoclave,Industrial Autoclave,Concrete Autoclave Changzhou machinery and equipment Imp.& Exp.Co.,Ltd , https://www.czautoclave.com

Address the processing challenges of additive manufacturing
